
Red, White & Blue: Home Decor by You - Patriotic DIY Decor
- May 6, 2018
- 4 min read

I've said it before and I'll say it again - I love having a fireplace mantel that I can decorate for each holiday. Because we've got a busy summer coming up in less than a month, I thought I'd combine Memorial Day and July 4 Decor and leave it all up through June.
I have a feeling I will add more things throughout the month, but this is a good starting point.
These are some easy DIYs that almost anyone can do, and if not, I've got them listed on etsy for purchase. I hope you enjoy, and I welcome your ideas and suggestions. Happy crafting!
My Projects & How Tos:
1. Patriotic mantel scarf. Materials & Instructions are provided in the link below.
I absolutely love how it turned out. The only thing I would do different is choose a lighter print for the pennants that I embroidered on. Other than a little puckering when I sewed the top and bottom half of the mantel scarf together, I love it. I found a great instructional at this website http://www.emblibrary.com/EL/elprojects/pdf/PR1200.pdf.


Several of the embroidery patterns are available for download at my etsy shop: https://www.etsy.com/shop/stitchesandkitsches
Also, you can download them here.
You can purchase the mantel scarf by heading over to my shop. The cost for a 78" scarf with six pennants is $50.00.
2. Red, White & Blue Painted Jars

Materials: My next project involved using some of the glass bottles I've been saving. I used an old olive jar, hot sauce jar, and pickle jar. I used Americana brand acrylic paints in True Blue, Primary Red, and White to paint each of the jars.
I had to use two coats, but the paint dried fairly fast, and it was relatively easy. After the paint dried, I added my ribbon. I think I may need to put a little something something on the two outer jars, but I haven't decided what. I had a wood & burlap star that I painted red and put a plethora of glitter on it.

I filled the jars with red, white & blue roses and some patriotic tinsel that I picked up at the Hobs. I am very pleased with the results. It was quick and easy.
Some variations - just use one coat and add either a candle or twinkle lights and you've got a patriotic light.
3. Canvas & Vinyl Project

Since canvas art is a pretty big thing, and I liked my Easter project, I did a patriotic canvas vinyl project as well. This is another easy project to do. Materials you'll need for this project: canvas (I used 8 x10), Cricut printable vinyl sheets, and cricut vinyl in color of choice. I designed my background in print shop and printed it on the vinyl sheet. I simply printed, peeled, and applied to my canvas board. Then I cut out the words One Nation Under God on my cricut and applied it to the top. Voila, an easy project. These are also for sale in my store.
4. Wood Block Decoupage

Do you ever have something in your head, and try it - but it didn't turn out the way you expected. That's what happened with this project. I didn't buy any patriotic paper/tissue paper/napkins to mod podge so I used the ribbon and I'm not liking how it turned out. Plus, my font choice and the fact that I think the block of wood was too small - but you can see it can be a fun piece and I may try again. It's a wood decoupage piece. Materials: wood block (I used 5x7), cricut glitter vinyl, mod podge, foam brush, patriotic material (I used my patriotic burlap ribbon and I didn't like how it turned out), tissue paper, or napkin (separate the top layer from the bottom layer of the napkin), drill, glue gun, and embellishment for the top bought at Hobby Lobby.
Instructions:
1. Cover the front and sides of the block of wood with mod podge.
2. Once thoroughly covered, cover the block of wood (front and sides) with your material, tissue paper, napkins, or choice.
3. After you have everything placed, go over the entire piece with mod podge and set aside to dry.
4. In the meantime, you can cut out your words, saying, symbol etc. on your Cricut machine.
5. After your project is dry, you can place your vinyl where you want it. my vinyl was having a hard time sticking so I used some Elmer's spray craft bond and it worked like a champ. Let it dry.
6. Drill a hole in the top middle of your poject and drop a dab of glue from your glue gun inside and add the embellishment of choice.
5. Patriotic Wall Hanging

I can't really do a great tutorial, instructional on how I did this because this was one of the things that I had pictured in my head - that actually turned out.
I am going to put it up on my etsy site, and sell it for $25.00.
I will also put up the "FREEDOM" applique and other patriotic appliques, embroidery that I designed.
I am really pleased with how this turned out. I'm learning how to use my different presser feet on my sewing/embroidery machine, and they are fun.
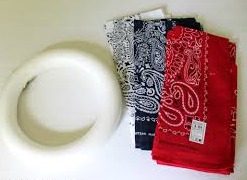
6. Patriotic Bandana/Rag Wreath

My sister Eve Lynn did one of these last year, and shared with me the how to.
Materials: 9 Bandanas - 3 red, 3 white, 3 blue, green styrofoam wreath (I used 9 inch), scissors, and ruler.
1. Cut three inch strips out of each color of bandana (they don't have to be perfect).
2. Place on the wreath as shown in the pictures below:
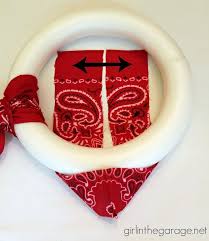
3. I alternated red and white and then did a blue section. The most time consuming part of this project was the cutting of the strips.
Crafting and sewing items I make and sell.
Downloadables and handmade invitations.
Feel free to share your patriotic crafts below, or toss me some ideas. Don't forget to subscribe to my blog if you haven't already.


Comments